
Van Plumbing System Breakdown
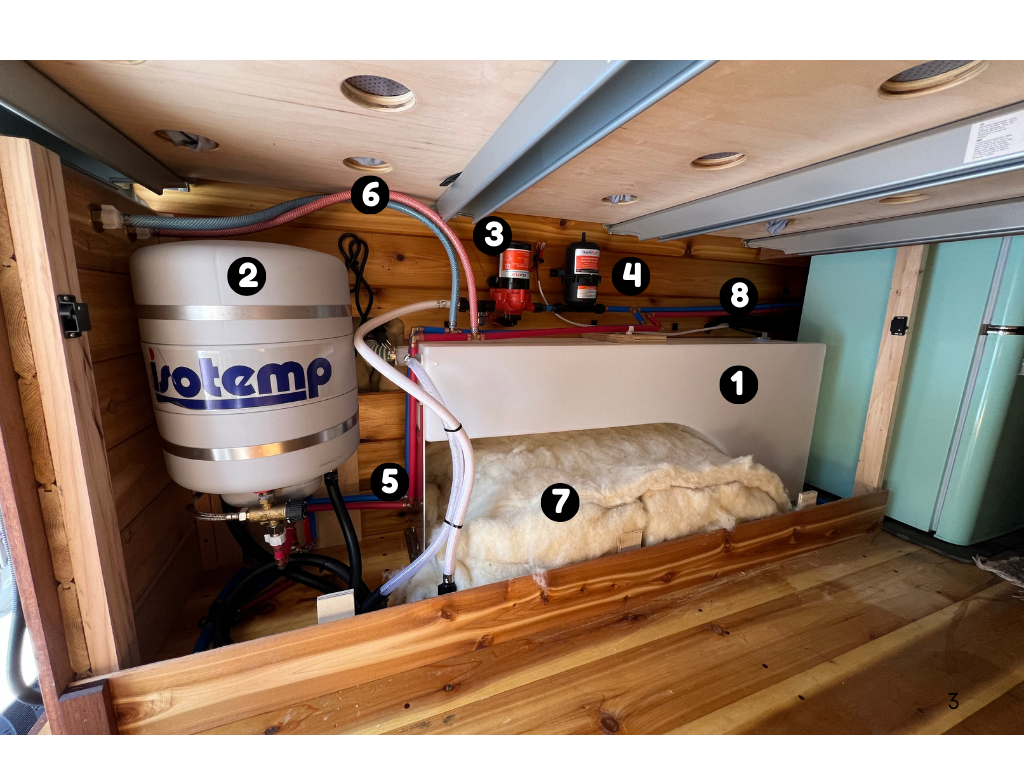
Here we have a fairly simple van plumbing system I installed in a 2021 Sprinter 144 4x4 dually. It supplies hot and cold water to a sink and a rear shower mixer on the back of the box. The Isotemp hot water heater has a passive engine heated coolant line as well as a 120v element. For the water lines I used a combination of PEX-B and RV vinyl braided hose (with SS PEX-B pinch clamps, more on this below). I always add drain valves to the low points of my water lines so its fast and easy to winterize the system. Hopefully this breakdown will assist you with your own plumbing system install.
The links below may be affiliate links (where I make a small commission) or they may just links to places where I buy my plumbing parts (I buy a lot of my fittings from www.supplyhouse.com).
Have specific questions or want to book a consultation call to go over your particular system? Check out my offerings HERE !
NW Conversions 25 gallon DUALLY wheel well tank. COUPON CODE: FENIXWATERYT
This high quality tank fits the Sprinter AND Transit dually wheel wells. I mounted this one backwards so I could fit the hot water heater in the back (easier to inspect and access the drain valves). The NW Conversions tanks are fitted with 1-1/2” spin welds on top so you can use a KUS float level sensor to monitor your tank. The S5U series are the ones you want as they thread into the port and use a Standard American Output, 240 ohm - 30 ohm (empty - full) signal that can connect to a Cerbo GX or a KUS level gauge.
Isotemp Spa 4.0 gallon. This 4 gallon Italian made hot water heater is a nice solution for engine powered mobile off grid applications. When fitted with an engine heat kit the 4 gallon holding tank is passively heated by the vehicle engine coolant system. Clients of mine have reported having hot water for about 12 hours after driving, now that depends on how long you’ve been driving for and the ambient temperature outside. It also has a drain/T&P valve so its easy to drain when its time to winterize.
The only issue I have with the engine heat kit is the potential to void vehicle warranties or create liability issue because you are literally cutting engine coolant hoses in half and splicing t-fittings on one of the most crucial systems in your vehicle. If there is an issue, loss of coolant can lead to overheating which can lead to engine failure.
Seaflo 12v water pump. I use this pump a lot and like it because its cheap, seems to hold up long term, and comes with a strainer. In all honesty I think most of the brand name pumps are good (probably made by the same manufacturer) with my other go-to being Shurflo. I typically shoot for 3.0 gal/minute flow rate and a 45 PSI cut off switch.
Seaflo water pump inline strainer. This is absolutely essential to use with your pump if you don’t already have one. It filters out the large debris from clogging or damaging your water pump. It has a removable and reusable screen that needs periodic cleaning. I’ve seen some gnarly stuff in these filters and have had a few folks bring me systems with low pressure issues because the screen is caked full of dirt, grime, goo, etc. The strainer has a nice clear bowl so you can see whats going on in there but it needs to be unscrewed and dumped out before winterizing as its easily the most common fault point of a frozen water system because well it just freezes and cracks.
Seaflo accumulator tank. Now this system shows a accumulator, which is basically a pressurized bladder or pressure tank for your camper. Its supposed to help control flow and reduce cycling of the water pump. I’ve seen plenty of pump systems and most don’t have an accumulator installed so its obviously not essential. What is essential however is that if you use an accumulator you must pressurize it to 3 PSI lower than the water pump cut off switch, which in this case would be 42PSI, otherwise it does nothing. I’ve seen a lot of DIY builds with an accumulator and then never pressurize it.
PEX-B 1/2” water lines. I buy these at my local Lowes store and buy it in 10’ straight lengths. The coils of tubing will forever hold their shape and make your install look amateur and hard to work with. I’ve never had a run longer than 10’ in vans but I know Lowes also sells 20’ lengths too. I would say all PEX-B is the constructed same, professional plumbers would probably have something to say about that. PEX-B is easier to install with crimp rings or pinch clamps vs PEX-A which uses an expansion fitting and requires a more expensive tool to install them. I’ve used both the copper crimp rings and the SS pinch clamps as they have their pros and cons.
RecPro 1/2" RV pressurized hot & cold water line. In addition to using PEX-B as water lines I’ve also experimented with using RecPro’s pressurized vinyl hose with PEX-B fittings and SS PEX-B pinch clamps. This is common practice in manufactured RV’s and it makes for a fast and easy installation with hoses snaking through walls and underbellies without having to navigate 90 degree elbows at every turn. I made a YouTube video on this and had some folks comment that RV techs reported that with time this combination of hose and PEX fittings eventually fails. So I’ll probably not continue this practice but boy is it easy to build with (I have a few other ideas I want to try regarding water supply lines, I’ll post them on YouTube).
Havelock wool! This van here was one of my first and last full solo builds and the client wanted all cedar and all wool! Which I absolutely loved working with. The wool smells great, feels great, and I skipped using any spray adhesive as its easier to fill voids and insulate larger areas by doubling up. I was happy I saved some wool from the first build phase (over 2 years ago!) and was able to insulate the wheel well.
KUS S5U level sensor Hard to see here, but on the top of this tank there is a 1-1/2” threaded spin weld for (optionally) housing a float level sensor. For this particular tank I used an 18” version. Simply drill or cut out the plug and thread the level sensor in with some silicone or plumber tape. I like to keep the bottom of my level sensor off the bottom of the tank at least 1”. The two wires from the sensor can then go to a KUS water level gauge or to your Cerbo GX as a resistive tank input as they use a Standard American Output, 240 ohm - 30 ohm (empty - full) signal. Now remember that these level sensors don’t automatically tell you the actual level of your tank unless you tank is uniformly shaped from top to bottom. They tell you what ‘level’ the float sensor is at. So for example, if your gauge is showing 50% it really means you have whatever water capacity is below the half way mark of your level sensor. This can be calibrated in your Cerbo GX system but not in a simple gauge dial.
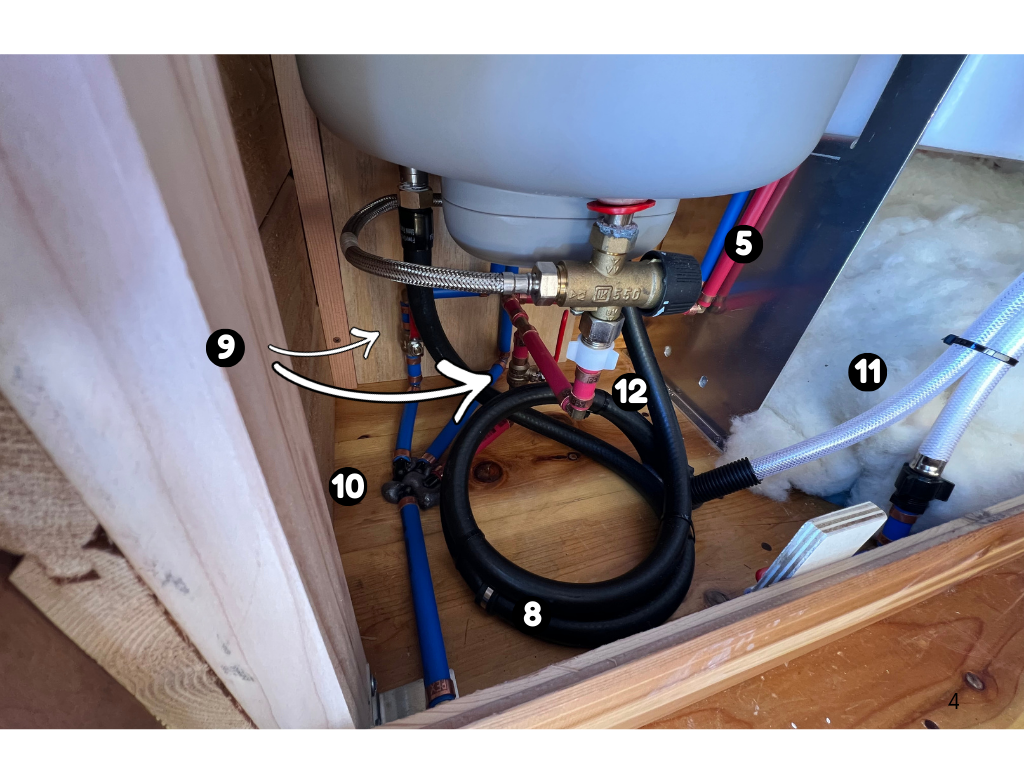
8. 5/8 heater hose from the engine bay. I coiled up extra hose here as a service loop for the system in case it ever needed to be moved or spliced somewhere along the run. It will have heated coolant circulating through it so in the summer the excess heat may be less desirable, but its something that can be turned off via valves in the engine bay.
9. Drains. So here are 4 different drain tubes: cold water supply, hot water supply, hot water heater drain/T&P, and then the main fresh water tank drain. Opening all 4 of these drains while simultaneously opening the hot and cold faucet(s) should allow the water to mostly drain out of the system. If you’re winterizing your system remember to empty your water pump strainer and any gray tanks as well. In this build I’m using 1/2” PEX-B ball valves but I prefer 1/4 turn T-handle versions.
10. 2” drain hole through floor. You need to get your drains exterior to the vehicle somehow. I typically use a hole saw to cut through the floor, making sure your hole is unobstructed below and not near an exhaust pipe, suspension component, brakeline, wires, etc. I also use a long pilot drill bit to test my location before cutting a larger opening. If I drill though metal, I use a deburring tool on the edge and then paint the exposed metal. I typically make my holes slightly larger than the pipes or tubes to provide some wiggle room and then seal the opening with either some Sikaflex 221 or for larger complex opening some expanding black foam.
11. 1/2” vinyl braided hose. Venting is an essential practice for your water tanks, whether they are fresh, gray, black, they need a vent. I’ve seen plenty of DIY builds with either no vents, vents that empty into the van, and vents that connect to the plumbing system (none of which are correct). As you fill or empty the tank, the displaced air or water needs to come from somewhere, which is your vent. Air travels in (if you’re draining) and out of your vent (if your filling) and needs to be large enough to match the volume and velocity off your draining or filling. If you accidentally overfill your tank the vent serves as an overflow and needs to drain as fast as its being filled or it will swell and potentially burst. Typically a 1/2”ID hose or tube is sufficient. I used to use PEX-B to run my vents but as I became more honest with my build practices I started using vinyl hose as its much quicker to install. I used a similar hose from a water pump silencing kit as the water pump pick up and it comes with crimped swivel fittings.
12. PEX-B female swivel. These are nice little solutions for connecting to your PEX-B to male NPT fittings which is what we have here on this Isotemp hot water heater. I also use them on any other components that might need servicing or replacing. They are designed to be tightened by hand and come in straight and 90 degree versions. I prefer brass over plastic. Now they don’t always seat tight on every male thread so pay attention to that. I buy all of my plumbing fittings from www.supplyhouse.com (they also have a TRADEMASTER account for businesses) but Amazon.com has a variety of fittings too.
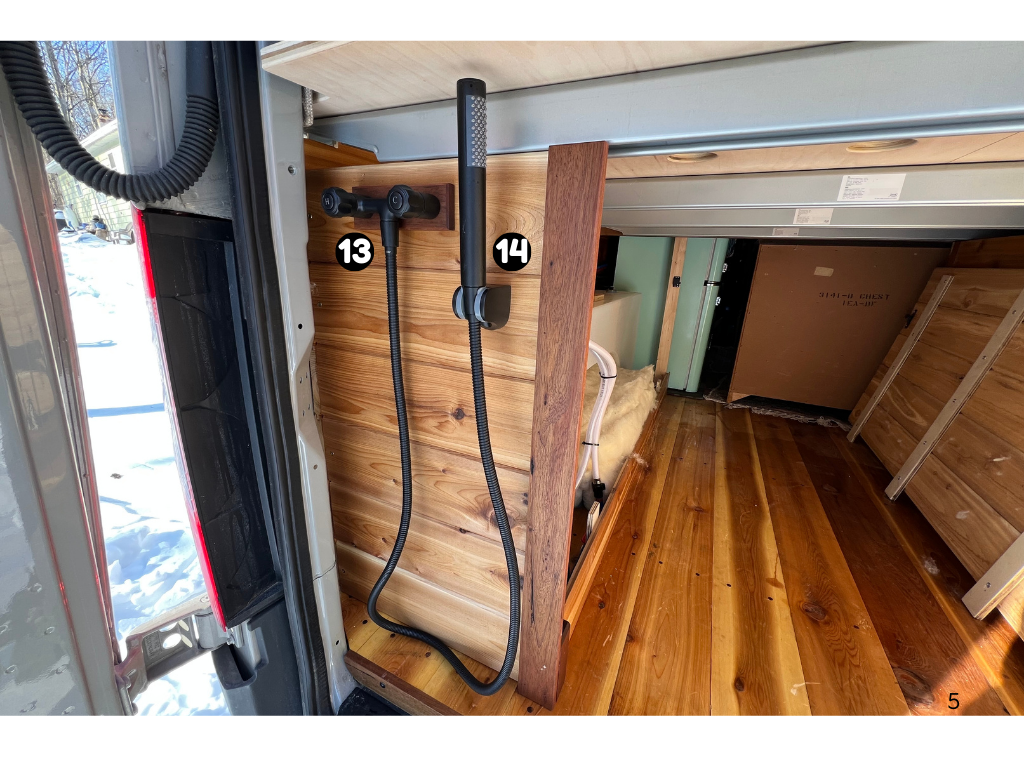
13. KES Shower Mixer. I’ve used a few of these all metal fixtures from KES and they feel quality and have performed well. I thought it matched the aesthetic here. I used the PEX-B swivels described above on the back side. This particular mixer does not have a quick connect fitting, which some builders might prefer. Another thing to say is that this mixer is a ‘surface’ mount vs a ‘panel’ mount meaning it sticks off the surface ~ 2-1/2”. There are lower profile and panel mount mixers out there. If you are looking for something like that let me know and I can make another post on high quality panel mount fixtures!
14. KES Shower Wand. This is a matching shower wand that I choose for the KES mixer that comes with a metal braided hose, hanger, and the sprayer. Now something it doesn’t have that I’ll add later is an on/off button. This allows you to conserve water by quickly turning the sprayer on/off (or lower the flow rate) and keep any water in the flexible hose from siphoning out when you’re done your shower. To winterize you just unscrew the hose from the mixer and drain manually.